Tampilkan postingan dengan label Windows 7. Tampilkan semua postingan
Tampilkan postingan dengan label Windows 7. Tampilkan semua postingan
Sabtu, 17 Agustus 2013
Cara Mengatasi file .dll is missing atau file.dll yang hilang Secara Manual di Windows
+OM+Kris+blog.jpg "file dll is missing (dll hilang) OM Kris blog")
Pernahkah sobat mengalami .dll is missing seperti kernel32.dll is missing, shell32.dll is missing, hal.dll is missing, net.dll is missing, suplib.dll is missing, libray.dll is missing, ntdll.dll is missing, isnssrv.dll, npptools.dll, wmasf.dll, dx8vb.dll, Binkw32.dll, vcomp100.dll, xinput1_3.dll, xlive.dll yang masuk dalam kategori system windows non direcxt? file tersebut biasanya tidak akan terdapat pada windows sejak ketika kita baru install ulang komputer karena adanya ketidaklancaran saat baru melakukan install ulang atau karena file tersebut hilang termakan virus. Akibatnya kita tidak bisa menjalankan beberapa program software aplikasi yang membutuhkan file .dll tersebut, termasuk untuk aplikasi game yang membutuhkan .dll tersebut.
Adalah dulu pengalaman OM Kris blog sendiri ketika mencoba membetulkan masalah seperti ini saat masih duduk dibangku kuliah, sehingga cara inipun saya temukan sendiri sampai melalui beberapa tes yang alhasil semua berhasil (cara yang kedua dibawah). Saking lamanya tidak menjumpai masalah tersebut, lambat laun-pun saya sampai lupa belum ter-posting disini. Ide artikel ini muncul kemarin ketika saya mencoba menjawab masalah file corrupt pada artikel saya yang berjudul Dwmapi.dll Is Either Not Designed To Run Windows.
Ada 2 cara untuk memperbaiki .dll is missing (.dll hilang) pada windows adapun caranya adalah sebagai berikut:
==> Cara pertama yaitu kita bisa mendownload file-nya lagi melalui internet, silahkan sobat masuk di www.dll-files.com, cari pada menu search dengan mengetikkan kata kunci file .dll yang hilang (lihat gambar dibawah - klik untuk perbesar).
+secara+manual.jpg "Mengatasi .dll is missing (.dll hilang) secara manual")
==> Cara kedua ini diperuntukan bagi yang suatu saat mengalami masalah file .dll is missing (.dll hilang) namun tidak sedang dalam koneksi internet. Kita bisa mengatasi .dll is missing atau .dll yang hilang secara manual tanpa mendownload file di internet, adapun bahan yang harus dipersiapkan yaitu kita harus menyediakan 2 laptop atau lebih entah itu yang satunya pinjam milik teman atau milik warnet :D
1. Saya misalkan disini kita akan memperbaiki file msvcp71. dll is missing.

2. Nah jika kita kehilangan file tersebut maka so pasti akan muncul keterangan seperti gambar diatas, perhatikan file msvcp71.dll tersebut. Silahkan sobat ketik msvcp71.dll di pencarian tempat terinstallnya OM windows contoh di file C: di komputer milik teman.
+secara+manual1.jpg "Mengatasi .dll is missing (.dll hilang) secara manual1")
+secara+manual1.jpg "Mengatasi .dll is missing (.dll hilang) secara manual1")
3. Setelah ketemu copas file tersebut ke USB Flashdisk kemudian masukan ke komputer sobat dan copas lagi di tempat seharusnya file tersebut berada. Lihat pada gambar dibawah ini - klik untuk perbesar, disini letaknya yaitu berada di C:\Windows\System32 (klik kanan file-pilih properties bila tidak muncul keterangan letak)

4. Kemudian tes dan jalankan program aplikasi atau game yang tidak jalan karena kehilangan file .dll atau .dll is missing tersebut, insyaAllah program aplikasi atau game sudah bisa berjalan normal :)
Selamat mencoba..


cara membuat tema chrome kreasi sendiri
Kali ini admin akan share tentang membuat tema chrome sendiri . Simak langkah langkahnya di bawah ini ,
1. buka alamat ini

2. install aplikasinya ( add to chrome )

3. klik add

4. klik start making theme

5. pilih gambar latar belakang , misal kita upload gambar dari komputer kita


6. klik adjust position untuk mengatur posisi gambar
7. klik pada image effect

8. pilihlah effect gambar yang sesuai
9. anda bisa memilih warna untuk masing masing element

10.klik continue

11. selesai
1. buka alamat ini

2. install aplikasinya ( add to chrome )

3. klik add

4. klik start making theme

5. pilih gambar latar belakang , misal kita upload gambar dari komputer kita
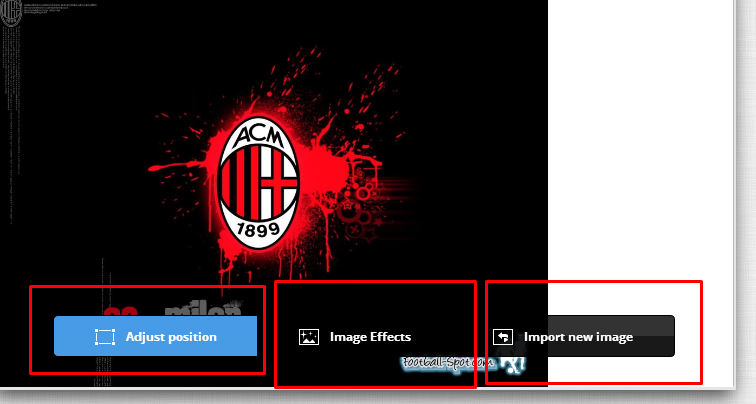
6. klik adjust position untuk mengatur posisi gambar
7. klik pada image effect

8. pilihlah effect gambar yang sesuai
9. anda bisa memilih warna untuk masing masing element

10.klik continue

11. selesai
Mengubah tampilan Chrome seperti windows 8
Kali ini saya akan share cara mengubah tampilan Homepage chrome menjadi seperti metro ui pada windos 8, nah simak caranya berikut ini :
1. buka alamat web berikut ini
2. klik pada launch app

3. kemudian anda akan di hadapkan dengan sebuah website dengan tampilan metro ui, copy alamat web tersebut (ctrl+c)

4. klik pada menu chrome

5. klik setting

6. klik set pages

7. paste kan alamat web yang telah di copy ke tabel tersebut ,

8. restart chrome anda
9. nikmati chrome dengan tampilan baru
Tips cara setting proxy di google chrome
Kali ini kami akan membahas tentang cara setting proxy di google chrome.
untuk melakukan setting proxy pada google chrome anda bisa megikuti langkah langkah berikut ini ,


untuk melakukan setting proxy pada google chrome anda bisa megikuti langkah langkah berikut ini ,
1.klik pada menu setting di google chrome , kemudian klik setelan

2. klik pada menu setelan selanjutnya klik tampilkanpengaturan lanjutan

3. klik pada ubah setelan proxy --> kemudian pilih koneksi anda misal (dial up connection) --> kemudian klik setting --> ceklik pada use proxy --> dan isikan proxy dan port yang anda ingin gunakan

4. klik ok dan selesai
Rabu, 10 Juli 2013
Windows 7 Generation Edition Ultimate SP1 x64 bit


HARDWARE MINIMUM YANG DI BUTUHKAN
Pentium 4 Processo, 2 gb ram
128 mb onboard graphics
Pentium 4 Processo, 2 gb ram
128 mb onboard graphics
Download link :
Windows 7 Ultimate ROG Edition Full x86-x64 SP1

Year: 2012
Version: Windows 7 Ultimate SP1 x86 | x64
Developer: MICROSOFT & [Varius] [SPA]
Language: Russian + English
Tablet: (after installation on drive C)
Size: 3.87 GB
This assembly is installed with a DVD drive or USB-drive.
1.Zapis to USB using the utility of Windows 7 RTM USBDVD Download Tool.
2.Zapis on a USB-disk using the command line (utility diskpart):
Version: Windows 7 Ultimate SP1 x86 | x64
Developer: MICROSOFT & [Varius] [SPA]
Language: Russian + English
Tablet: (after installation on drive C)
Size: 3.87 GB
This assembly is installed with a DVD drive or USB-drive.
1.Zapis to USB using the utility of Windows 7 RTM USBDVD Download Tool.
2.Zapis on a USB-disk using the command line (utility diskpart):
In the dual-boot:
= Total Commander 6.5 – File Manager
= Bootice-manipulation tool for boot sectors …
= Standard x86 system recovery environment
= Gimagex v.2.014 en – Graphical user interface (GUI) for ImageX.
= Set screen resolution to start the download
= Active @ Password Changer en – Программма allows you to reset the administrator password
= AntiWinLocker 3.3 – a means to combat extortion SMS
= AVZ 4.37 – Anti-Zaitsev. Very useful for removing rootkits
= Universal Virus Sniffer 3.72 + – Designed to combat unknown viruses and not only
= Acronis ® True Image ™ Home 2011 Plus Pack – Backup and Restore
= Acronis ® Disk Director ™ 11 Home – Working with sections of the HDD
= Acronis ® Recovery Expert – Provides complete protection of your data, allowing you to recover deleted or lost partitions
= Total Commander 6.5 – File Manager
= Bootice-manipulation tool for boot sectors …
= Standard x86 system recovery environment
= Gimagex v.2.014 en – Graphical user interface (GUI) for ImageX.
= Set screen resolution to start the download
= Active @ Password Changer en – Программма allows you to reset the administrator password
= AntiWinLocker 3.3 – a means to combat extortion SMS
= AVZ 4.37 – Anti-Zaitsev. Very useful for removing rootkits
= Universal Virus Sniffer 3.72 + – Designed to combat unknown viruses and not only
= Acronis ® True Image ™ Home 2011 Plus Pack – Backup and Restore
= Acronis ® Disk Director ™ 11 Home – Working with sections of the HDD
= Acronis ® Recovery Expert – Provides complete protection of your data, allowing you to recover deleted or lost partitions
USB:
Step 1:
* Take the USB-drive (and can be another medium such as SD-cards) not less than 8GB, connecting to the USB-port, ready to sacrifice all the information contained therein
* Run the command prompt CMD.EXE from administrator
* Run the management utility diskpart, wait prompt DISKPART>
* Execute the command list disk, displays a list of all drives (not partitions!) PC. We are looking for among them our drive USB, in this example, Disk 1
* Execute the command select disk # (where # – is the number of our USB-drive, resulting in the previous command). In our case – select disk 1. This command tells diskpart, that all further operations will be conducted for this disk
* Execute the command clean (goodbye data and partitions on selected disk)
* Execute the command create partition primary – to create a new partition on the disk
* Execute the command select partition 1 – Select the partition, as further objects to manipulate
* Active – do your partition active
* Format fs = NTFS – format the partition to NTFS
* Assign – activate the connection of the device, receiving letters for the newly created partitions (if enabled the autostart option – pops up a window, as if you just hooked up the USB-drive)
* Exit – exit diskpart at the command line.
USB-drive is ready for further manipulation
Step 2:
And now attention. Take your existing copy of Windows 7, say, a DVD-ROM drive installed in H:
At the command prompt (not in diskpart!!!) Sleduyushie perform the command:
* H:
* Cd \ boot – go to the directory boot distro
* Execute the command bootsect / nt60 J: – where J: – letter received just prepared USB-drive. This command replaces the disk J: boot files on the ones you want to download Windows 7
* One point – bit depth and the base OS distribution of Windows 7 should be the same
Step 3:
Copy the contents of the installation disk with Windows on a flash drive
To do this, simply enter this command that will copy the
Content from the Windows DVD to a brand new, just formatted
High-Speed Flash Drive:
* Take the USB-drive (and can be another medium such as SD-cards) not less than 8GB, connecting to the USB-port, ready to sacrifice all the information contained therein
* Run the command prompt CMD.EXE from administrator
* Run the management utility diskpart, wait prompt DISKPART>
* Execute the command list disk, displays a list of all drives (not partitions!) PC. We are looking for among them our drive USB, in this example, Disk 1
* Execute the command select disk # (where # – is the number of our USB-drive, resulting in the previous command). In our case – select disk 1. This command tells diskpart, that all further operations will be conducted for this disk
* Execute the command clean (goodbye data and partitions on selected disk)
* Execute the command create partition primary – to create a new partition on the disk
* Execute the command select partition 1 – Select the partition, as further objects to manipulate
* Active – do your partition active
* Format fs = NTFS – format the partition to NTFS
* Assign – activate the connection of the device, receiving letters for the newly created partitions (if enabled the autostart option – pops up a window, as if you just hooked up the USB-drive)
* Exit – exit diskpart at the command line.
USB-drive is ready for further manipulation
Step 2:
And now attention. Take your existing copy of Windows 7, say, a DVD-ROM drive installed in H:
At the command prompt (not in diskpart!!!) Sleduyushie perform the command:
* H:
* Cd \ boot – go to the directory boot distro
* Execute the command bootsect / nt60 J: – where J: – letter received just prepared USB-drive. This command replaces the disk J: boot files on the ones you want to download Windows 7
* One point – bit depth and the base OS distribution of Windows 7 should be the same
Step 3:
Copy the contents of the installation disk with Windows on a flash drive
To do this, simply enter this command that will copy the
Content from the Windows DVD to a brand new, just formatted
High-Speed Flash Drive:
* Xcopy H: *.* / s / e / f J:
* In my case it was so: xcopy H: *.* / s / e / f J:
* In my case it was so: xcopy H: *.* / s / e / f J:
* H:-This drive, J:-This is a Flash Drive
Step 4:
* Load the appropriate PC with the received USB-drive, install it with Windows 7.
Step 4:
* Load the appropriate PC with the received USB-drive, install it with Windows 7.
Embed:
Topics
Fixed bug the Start menu
Icons
Critical Update for January 15, 2012
Mozilla Firefox 9.0.1
Winrar 4.10
Unlocker1.9.1
Rainmeter
UltraIso 9.5.2.2836
Adobe Flash Plaer 11.1.102.55
Topics
Fixed bug the Start menu
Icons
Critical Update for January 15, 2012
Mozilla Firefox 9.0.1
Winrar 4.10
Unlocker1.9.1
Rainmeter
UltraIso 9.5.2.2836
Adobe Flash Plaer 11.1.102.55
Tweaks:
Disabled:
-UAC
-Defender
-Windows Firewall
-Hibernation
-PCA
Message ‘The disk little space’
-Debugger to speed up
Message and sending the MS error
Remote Registry Service
The automatic update
-Automatic restart your computer when BSOD
-UAC
-Defender
-Windows Firewall
-Hibernation
-PCA
Message ‘The disk little space’
-Debugger to speed up
Message and sending the MS error
Remote Registry Service
The automatic update
-Automatic restart your computer when BSOD
RMB:
+ Become the owner and ask the full access to the object (RMB + Shift)
+ Copy to … (RMB + Shift)
+ Move to … (RMB + Shift)
+ Open in Notepad
+ Programs and Features
+ Device Manager
+ Registry Editor
+ Flip3D
+ Services
+ Become the owner and ask the full access to the object (RMB + Shift)
+ Copy to … (RMB + Shift)
+ Move to … (RMB + Shift)
+ Open in Notepad
+ Programs and Features
+ Device Manager
+ Registry Editor
+ Flip3D
+ Services
* Parameters prefetchera to reduce memory consumption and disk space
* Increase the priority of interrupts IRQ8 to speed up
* Speed up the Start menu
* Enable Word Wrap in Notepad
* Increased speed of the mouse pointer
* Speed up shutdown
* Do not grouping similar applications in the taskbar
* Sort the Start menu and Favorites in alphabetical order
* Optimize the work of memory and cache
* Increase the priority of interrupts IRQ8 to speed up
* Speed up the Start menu
* Enable Word Wrap in Notepad
* Increased speed of the mouse pointer
* Speed up shutdown
* Do not grouping similar applications in the taskbar
* Sort the Start menu and Favorites in alphabetical order
* Optimize the work of memory and cache
Description:
Multiboot Disc
At the heart of multiboot is Reanimator v01.01.2012
Multiboot Disc
At the heart of multiboot is Reanimator v01.01.2012
System requirements:
* Processor: 1.5 GHz
* RAM: 1GB or higher
* Disk space: 12 GB
* Video: DirectX 9 support and 128MB of memory (for the theme Aero)
* 2GB of RAM when used with Windows Virtual PC
* Processor: 1.5 GHz
* RAM: 1GB or higher
* Disk space: 12 GB
* Video: DirectX 9 support and 128MB of memory (for the theme Aero)
* 2GB of RAM when used with Windows Virtual PC
Checksums:
CRC32: 1A8E4825
MD5: F9A12D03761BFA46DBCB26DF2BD9752F
SHA-1: BC48605C05F333AB57D5E890D8A544EBAF47F101
CRC32: 1A8E4825
MD5: F9A12D03761BFA46DBCB26DF2BD9752F
SHA-1: BC48605C05F333AB57D5E890D8A544EBAF47F101


DOWNLOAD
DOWNLOAD
64x
Sumber : www.os-cyber.com
Cara Menambahkan Nama Anda di Jam Dekat Toolbar Windows
Tips dan Trick kali ini adalah sebuah trick sederhana namun bisa kita
gunakan untuk laptop pribadi maupun laptop teman anda...dimana kita akan
menambahkan nama kita di Jam yang ada di toolbar windows...


♥ Sebelum ♥

♥ Sesudah ♥

Nah pada gambar diatas sudah terlihat jelaskan apa yang saya maksud,
jadi anda bisa iseng dilaptop teman anda dengan menambahkan nama
sendiri....gituuu
Cara Menambahkan Nama di Toolbar jam
• Buka "Control Panel"
• Pilih "Clock, Language, Region"

• Kemudian Pilih "Region"

• Selanjutnya Pilih "Additional Setting..."

• Pilih Tab "Time" dan Pada Kolom AM dan PM Symbol, Ubah namanya sesuai dengan keinginan anda, dan Klik OK...dan Lihatlah perubahannya...

Jumat, 05 Juli 2013
Cara Mudah Mengganti Tombol Start
Saya
yakin bagi para pengguna Windows 7 seringkali merasa bosan dengan
tampilan Start Menu yang ada di pojok kiri bawah itu. Yah…memang
membosankan sekali tampilannya….adakah cara untuk merubah tampilan
tombol Start itu??

Hehehe…ya
pasti ada dong, karena pada artikel kali ini saya akan menunjukkan pada
anda cara mudah untuk merubah dan memodifikasi tampilan tombol Start
menu Windows 7 anda agar menjadi lebih keren dan lebih gaya. Anda bisa
merubah menjadi icon Smile, Icon Ubuntu, Icon Fire, Halilintar dan lain
sebagainya…pokoknya keren deeeh. Berikut ini caranya :
Berikut ini tampilan tombol Start sebelum diubah.

Download dulu pada link yang sudah tersedia di bagian bawah.
Extarct file yang sudah anda download karena filenya dalam bentuk .rar
Open Windows 7 Start Button Changer, klik kanan pilih Run As Administator untuk menjalankannya
Setelah di Run As Administator muncul kotak seperti di bawah ini

Pilih Select & Change Start Button Nomor yang pertama untuk mengganti Button Start Menu
Kemudian
bukalah folder Start Button yang ada di dalam folder yang sudah anda
download tadi. Pilih salah satu icon yang anda sukai dan klik Open.

Taraaaaa!!!
Berikut ini tampilan tombol Start setelah diubah….dan tombol Start ini
bisa bergerak looooo hehehehe coba anda dekatkan mouse anda.

Anda juga dapat merubahnya lagi sesuai keinginan. Caranya masih sama.

Trusss!!
Gimana cara merubah ke tampilan semula?? Hehehe caranya silakan anda
klik tombol Restore Original Explorer Backup dan pasti tampilan
tombolnya sudah kembali seperti sedia kala.
Download Windows 7 Start Button Changer (via Mediafire 473 KB)
70 Gadget Mantap Untuk Windows 7

Saya
yakin, pasti semua pengguna Windows Seven pasti tau apa itu Gadget yang
biasanya ada di desktop dan fungsinya. Yap…Gadgets merupakan hiasan
yang biasanya ada di destop Win 7 anda.
Nah….jika
biasanya Gadgets yang ada di desktop anda cuman itu-itu saja, maka kali
ini saya akan bagi-bagi Gadgets untuk Windows 7 yang Super Mantap.
- Cara penggunaannya gampang koq. Pertama-tama silakan anda Download pada Link yang sudah tersedia di bawah kemudian silakan anda > extract filenya > kemudian klik 2x pada salah satu gadgets yang anda pilih misalnya “Twenty Four Clock” > klik Install.

- Lihat Gadgets “Twenty Four Clock” dengan klik kanan pada desktop pilih Gadgets

- Cara menggunakannya tinggal klik kanan > pilih Add

Langganan:
Postingan (Atom)